Now Accepting Online Bookings!
New Mexico's Plumbing, Boiler and HVAC Experts
Get Your Swamp Cooler Ready for Summer: The Ultimate Maintenance Guide
Is your evaporative cooler ready for the heat? Learn how to clean, inspect, and prep your swamp cooler for peak efficiency with our expert guide.
Matthew Waller
3/10/20264 min read
As the temperatures start to climb and the dry heat sets in, your home's cooling system becomes the most important appliance you own. For many homeowners in our area, an evaporative cooler (often affectionately called a "swamp cooler") is the secret weapon against summer swelter. These units are energy-efficient and effective, but they require a bit more hands-on care than a standard central air conditioner.
If your cooler has been sitting dormant under a canvas cover all winter, you can't just flip the switch and expect a cool breeze. Without proper spring maintenance, you might be greeted by a blast of musty, hot air—or worse, a flooded roof.
At Waller's Plumbing and Heating, Inc., we know that a little preparation goes a long way. Getting your cooler ready now ensures you stay comfortable when the first heatwave hits. Here is your comprehensive guide to waking up your swamp cooler for the season.
Why Pre-Season Maintenance Matters
Think of your evaporative cooler like a car that has been parked in a garage for six months. You wouldn't just turn the key and drive onto the highway without checking the tires and oil first.
Skipping spring maintenance can lead to several headaches:
Reduced Efficiency: Dirty pads and mineral buildup restrict airflow, meaning the unit runs longer but cools less.
Water Damage: Winter freezes can crack water lines or float valves. If you turn the water on without checking, you could cause significant leaks.
Poor Air Quality: A dirty water pan can become a breeding ground for bacteria and mold, which then gets blown directly into your living room.
Premature Failure: A lack of lubrication or a loose belt puts unnecessary strain on the motor, shortening the lifespan of the unit.
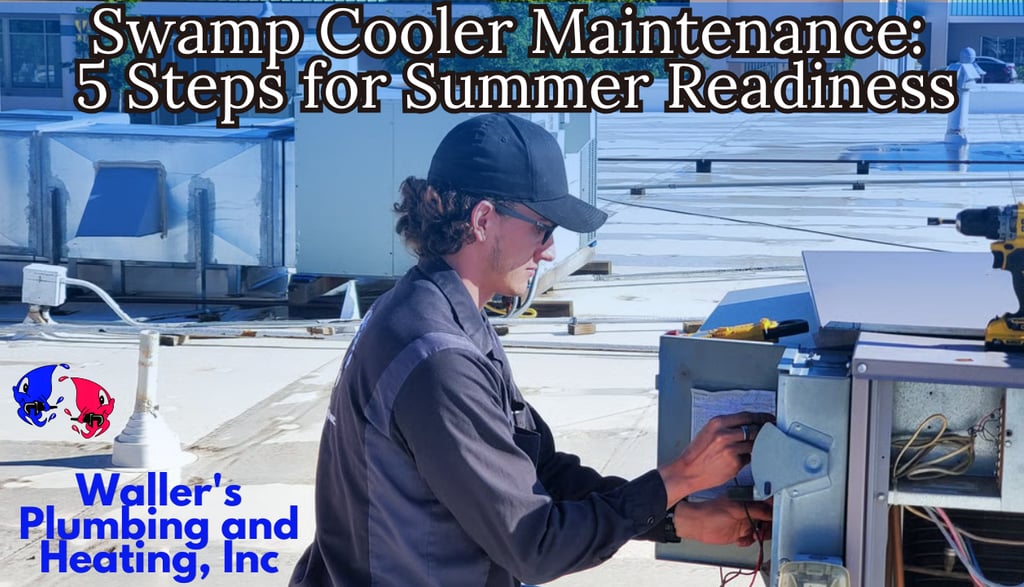
Step 1: Unwrap and Inspect the Exterior
Start by safely accessing the unit. For most people, this means getting up on the roof, so exercise extreme caution. If you aren't comfortable with ladders, this is the time to call a professional.
Remove the winter cover and fold it away for next season. Take a good look at the exterior of the unit. You are looking for rust spots, dents, or signs that the panels aren't fitting correctly. Check the louvers (the slats on the side panels) to ensure they aren't bent or blocked by debris.
Step 2: The Deep Clean
The heart of a swamp cooler is water, and where there is water, there are mineral deposits. Over time, calcium and magnesium from hard water build up in the bottom pan, creating a crusty layer that can clog pumps and corrode metal.
Remove the Panels: Take off the side panels to access the interior.
Drain the Pan: If there is old, stagnant water left from last year, drain it immediately.
Scrub the Pan: Use a wire brush and a shop vac to remove loose scale, dirt, and old leaves. If the buildup is severe, a specialized descaling solution or white vinegar can help break it down.
Inspect for Rust: Once clean, look for any rust holes in the pan. If you find small ones, they can often be sealed with a specialized cooler coating (often a black, tar-like substance). Large holes usually mean it's time for a new unit.
Step 3: Inspect and Replace the Pads
The cooling pads are the filters through which the air passes. If they are clogged with minerals or old dust, the air cannot flow freely, and the water cannot evaporate efficiently.
Aspen Pads (Wood shavings): These typically need to be replaced every year. If they look brittle, thin, or caked with salt, throw them out and install fresh ones.
Synthetic/Rigid Media: These last longer but still need cleaning. Check them for calcium buildup. If they are relatively clean, you can wash them carefully with a hose. If the honeycomb structure is crushed or clogged, they need replacement.
Step 4: Mechanical Check-Up (Belt and Motor)
Now, look at the moving parts that make the magic happen.
The V-Belt: The belt connects the motor to the blower fan. Press down on the belt with your finger. It should have about an inch of play. If it's too loose, the fan won't spin fast enough. If it's too tight, it can burn out the motor bearings. Also, check for cracks or fraying—a broken belt on a 100-degree day is a nightmare you want to avoid.
Lubrication: Many older cooler motors and pillow block bearings have oil ports. Add a few drops of non-detergent cooler oil (usually SAE 20) to keep things spinning smoothly. Note: Newer motors are often sealed and do not require oiling, so check your owner's manual first.
Step 5: The Water System Test
This is the most critical step to prevent leaks.
Connect the Water Line: Reconnect the copper or plastic water supply line to the unit.
Turn on the Water: Slowly turn on the shut-off valve (usually located in a closet, utility room, or outside).
Check the Float Valve: Watch the water fill the pan. The float valve should rise and shut off the water before it reaches the overflow pipe. If the water keeps running and goes down the overflow, you need to adjust or replace the float.
Test the Pump: Turn the cooler switch to "Pump Only" (if your thermostat has this setting). Watch to ensure the pump is pushing a steady stream of water into the distribution spider (the tubes at the top). Ensure the water is flowing evenly over the pads.
When to Call the Pros at Waller's
While many homeowners can handle basic pad replacement and cleaning, some issues require a certified HVAC technician. You should call Waller's Plumbing and Heating if:
The motor hums but won't start: This could be a bad capacitor or a seized motor.
You smell burning: Turn it off immediately! This is an electrical hazard.
The airflow is weak despite new pads: This suggests ductwork issues or a failing blower wheel.
You aren't comfortable on the roof: Your safety is worth more than the cost of a service call.
Schedule Your Spring Start-Up Today
Don't wait until the first scorching day of summer to find out your cooler is broken. Beat the rush and ensure your home is cool, comfortable, and efficient from day one.
At Waller's Plumbing and Heating, Inc., we specialize in comprehensive cooler start-ups. We'll handle the ladder work, the cleaning, and the technical adjustments so you can relax.
Ready for summer? Contact us today to schedule your evaporative cooler service!
Connect With Us
Email: support@wallersplumbingandheating.com
Follow Us
Los Alamos & White Rock
Phone: (505) 672-3141
Rio Rancho & Surrounding areas
Phone: (505) 619-4386